缓冲区 Buffer 是一个固定容量的数组,其作用是一个作为存储器,或者分段运输区,用于存储和检索数据。
Buffer
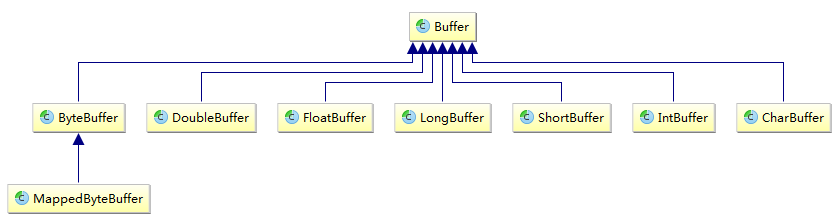
上图是 Buffer 的类继承结构,顶部Buffer中定义了所有缓冲区需要实现的方法,下面列出这些方法的签名
:java.nio.Buffer 1 2 3 4 5 6 7 8 9 10 11 12 13 14 15 16 17 18 19 20 21 22 public abstract class Buffer { public final int capacity () ; public final int position () ; public final Buffer position (int newPositio) ; public final int limit () ; public final Buffer limit (int newLimit) ; public final Buffer mark () ; public final Buffer reset () ; public final Buffer clear () ; public final Buffer flip () ; public final Buffer rewind () ; public final int remaining () ; public final boolean hasRemaining () ; public abstract boolean isReadOnly () ; public abstract boolean hasArray () ; public abstract Object array () ; public abstract int arrayOffset () ; public abstract boolean isDirect () ; }
其实Buffer就是由数据,以及操作这些数据的四个索引组成 ,而且无论如何操作,会始终保证这些索引满足关系:
1
2
3
4
5
6
7
public abstract class Buffer { private int mark = -1 ; private int position = 0 ; private int limit; private int capacity; }
下面结合具体的读写操作,简单演示一下这些索引的变化过程
1.allocate()/allocateDirect(),首先申请缓存,此时 position 指向开头,limit 和 capacity 则指向末尾
2.put()/read(),然后写入或读入数据,之后 position 将指向数据的下一个位置
注意如果数据的长度大于当前可用长度,将会抛出BufferOverflowException异常,可以通过remaining()查看当前的剩余可用长度来避免这种情况
3.flip(),将 position 复位为0,同时将 limit 指向 position 之前所在位置,这样 position 和 limit 之间就是可读的有效数据
另外,如果调用rewind(),将仅仅复位 position ,而不修改 limit
4.get(),读取相应字节数的数据,比如get(byte[])将数据字节读入给定的数组中,getInt()将读取4个字节,读取后 position 指向已读数据的下一位
5.compact(),将 position 与 limit 之间还未读取的数据拷贝到Buffer最前面,然后将 position 指向数据的后一位,并将 limit 移动至 capacity ,这样 position 与 limit 之间就是已读或脏数据,可以放心地覆盖了。由于Buffer是非阻塞的,那么在放入数据时可能无法确定之前的数据是否已经读完。
6.clear(),将Buffer还原成初始状态,以便下次使用
ByteBuffer Buffer的实现有很多种,不过api都是相似的,这里以ByteBuffer为例进行说明,因为在NIO网络编程中,通道就是从ByteBuffer中读取的数据,比如在了解了上面的操作之后,对于一般的读写操作就可以如下进行
1 2 3 4 5 6 7 8 9 10 11 ByteBuffer buffer = ByteBuffer.allocate(4096 );buffer.put(bytes); buffer.flip(); channel.write(buffer); ByteBuffer buffer = ByteBuffer.allocate(4096 );channel.read(buffer) buffer.flip(); buffer.get(bytes);
但是 Buffer 对应的七种数据类型实现都是抽象的,也就不能够直接实例化,不过它们各自提供了自己的静态工厂
:java.nio.ByteBuffer 1 2 3 4 5 6 7 8 9 10 11 12 13 14 public abstract class ByteBuffer { public static ByteBuffer allocateDirect (int capacity) ; public static ByteBuffer allocate (int capacity) ; public static ByteBuffer wrap (byte [] array) ; public static ByteBuffer wrap (byte [] array, int offset, int length) ; public abstract byte get ( ) ; public abstract byte get (int index) ; public abstract ByteBuffer put (byte b) ; public abstract ByteBuffer put (int index, byte b) ; }
DirectByteBuffer 为了避免频繁的在用户空间与内核空间拷贝数据,通常会直接从内核空间中申请内存作为缓存
在Java中,直接内存的申请与释放需要手动调用 Unsafe 类的allocateMemory和freeMemory,不过 DirectByteBuffer 帮我们简化了操作
:java.nio.DirectBuffer mark:15,27 1 2 3 4 5 6 7 8 9 10 11 12 13 14 15 16 17 18 19 20 21 22 23 24 25 26 27 28 29 30 31 32 33 class DirectByteBuffer extends MappedByteBuffer implements DirectBuffer { DirectByteBuffer(int cap) { super (-1 , 0 , cap, cap); boolean pa = VM.isDirectMemoryPageAligned(); int ps = Bits.pageSize(); long size = Math.max(1L , (long )cap + (pa ? ps : 0 )); Bits.reserveMemory(size, cap); long base = 0 ; try { base = unsafe.allocateMemory(size); } catch (OutOfMemoryError x) { Bits.unreserveMemory(size, cap); throw x; } unsafe.setMemory(base, size, (byte ) 0 ); if (pa && (base % ps != 0 )) { address = base + ps - (base & (ps - 1 )); } else { address = base; } cleaner = Cleaner.create(this , new Deallocator (base, size, cap)); att = null ; } }
可以看到,其在构造器中也是通过Unsafe.allocateMemory()申请的内存,然后由于其自身也一个Java对象,因此在不再使用后可以由JVM自动GC,于是注册一个钩子,在GC回收时回调释放内存操作
:java.nio.DirectBuffer mark:21 1 2 3 4 5 6 7 8 9 10 11 12 13 14 15 16 17 18 19 20 21 22 23 24 25 26 private static class Deallocator implements Runnable { private static Unsafe unsafe = Unsafe.getUnsafe(); private long address; private long size; private int capacity; private Deallocator (long address, long size, int capacity) { assert (address != 0 ); this .address = address; this .size = size; this .capacity = capacity; } public void run () { if (address == 0 ) { return ; } unsafe.freeMemory(address); address = 0 ; Bits.unreserveMemory(size, capacity); } }
上面在申请和释放内存时有两个操作reserveMemory和unreserveMemory,其用来记录申请的内存总量,并检查是否超过了限制
:java.nio.Bits mark:29 1 2 3 4 5 6 7 8 9 10 11 12 13 14 15 16 17 18 19 20 21 22 23 24 25 26 27 28 29 30 31 32 33 34 35 36 37 38 39 40 41 42 43 44 45 46 47 48 49 50 51 52 53 54 55 56 57 58 59 60 61 62 63 64 65 66 67 68 69 70 71 72 73 74 75 76 77 78 79 80 81 82 83 84 private static volatile long maxMemory = VM.maxDirectMemory();private static final AtomicLong reservedMemory = new AtomicLong ();private static final AtomicLong totalCapacity = new AtomicLong ();private static final AtomicLong count = new AtomicLong ();static void reserveMemory (long size, int cap) { if (!memoryLimitSet && VM.isBooted()) { maxMemory = VM.maxDirectMemory(); memoryLimitSet = true ; } if (tryReserveMemory(size, cap)) { return ; } final JavaLangRefAccess jlra = SharedSecrets.getJavaLangRefAccess(); while (jlra.tryHandlePendingReference()) { if (tryReserveMemory(size, cap)) { return ; } } System.gc(); boolean interrupted = false ; try { long sleepTime = 1 ; int sleeps = 0 ; while (true ) { if (tryReserveMemory(size, cap)) { return ; } if (sleeps >= MAX_SLEEPS) { break ; } if (!jlra.tryHandlePendingReference()) { try { Thread.sleep(sleepTime); sleepTime <<= 1 ; sleeps++; } catch (InterruptedException e) { interrupted = true ; } } } throw new OutOfMemoryError ("Direct buffer memory" ); } finally { if (interrupted) { Thread.currentThread().interrupt(); } } } private static boolean tryReserveMemory (long size, int cap) { long totalCap; while (cap <= maxMemory - (totalCap = totalCapacity.get())) { if (totalCapacity.compareAndSet(totalCap, totalCap + cap)) { reservedMemory.addAndGet(size); count.incrementAndGet(); return true ; } } return false ; } static void unreserveMemory (long size, int cap) { long cnt = count.decrementAndGet(); long reservedMem = reservedMemory.addAndGet(-size); long totalCap = totalCapacity.addAndGet(-cap); assert cnt >= 0 && reservedMem >= 0 && totalCap >= 0 ; }
根据上面的实现,可以知道Bits其实就是直接内存的分配担保,当有足够的内存可以用时,直接修改计数,否则调用System.gc。
虽然System.gc只会回收堆内存中的对象,但是 DirectByteBuffer 对象在回收时会触发其对应的钩子释放直接内存,这样就可以让已经使用完的DirectByteBuffer得到及时的回收,从而再次尝试时就可能申请成功。
所以有的地方在讲解Nio使用的时候,建议不要禁用System.gc,因为这样更容易造成直接内存溢出。但这也不是绝对的,因为毕竟 System.gc 导致的是 FullGC,可能会暂停应用线程。因此可以根据实际情况调大直接内存的使用限制,然后禁用 System.gc 即可
1 -XX:+DisableExplicitGC -XX:MaxDirectMemorySize=256M
参考:
http://www.tianshouzhi.com/api/tutorials/netty/315 http://www.tianshouzhi.com/api/tutorials/netty/331 https://blog.csdn.net/helloHuaKai/article/details/81457083