Java在操作系统的基础上对I/O操作提供了更高级的Api封装,可以对这些Api进行一些粗略的分类,比如从数据格式的角度可以分为基于字节操作的InputStream和OutputStream,以及基于字符操作的Reader和Writer,从数据传输方式的角度可以分为基于磁盘操作的File和基于网络操作的Socket,其实在Java中,I/O主要考虑的就是以怎样的方式将怎样格式的数据进行传输的问题 ,然后从这两个方向考虑如何提高I/O操作的效率
由于I/O类库有很多类,很难对每个都介绍到位,这里只是简单从文件操作的场景对一些常用的Api做一些梳理,尽量从中去体会Java语言对于I/O操作支持和封装的思路,另外,如果想对I/O有更好的理解,最好先有如下准备知识:
1. 字节流处理 编程语言的I/O类库常使用流的概念,它表示任何有能力产出数据的数据源对象或者有能力接收数据的接收端对象 。Java中将流分为输入和输出两部分,下面按照功能对主要的类做一下分类
InputStream:
类
功能
说明
ByteArrayInputStream
将内存的缓冲区当作InputStream使用
缓冲区,可以从中取出字节
FileInputStream
从文件中读取字节
实际是针对一个文件描述符操作
PipedInputStream
实现管道化概念
作为多线程中数据源
SequenceInputStream
将多个InputStream转换成单一的InputStream
FilterInputStream
作为装饰器的基类,为具体InputStream添加功能
DataInputStream
按照数据类型读取
持有具体InputStream,并提供类型数据读取的接口
BufferedInputStream
缓冲读取
OutputStream:
类
功能
说明
ByteArrayOutputStream
在内存创建缓冲区,并向其中写入字节
缓冲区,可以写入字节进行保存
FileOutputStream
向文件中写入字节
实际是针对一个文件描述符操作
PipedOutputStream
任何写入其中的信息都会自动作为相关PipedInputStream的输出
指定用于多线程的数据的目的地
FilterOutputStream
作为装饰器的基类,为具体OutputStream添加功能
DataOutputStream
与DataInputStream搭配,可以按照可移植的方式向流中写入类型数据
BufferedOutputStream
缓冲写
可以调用flush()清空缓冲区
PrintStream
格式化输出
这里说一下FilterInputStream和FilterOutputStream,它们是输入输出流进行装饰的基类,其持有某个具体Stream的实例,并在此基础上提供一些功能接口。比如BufferedInputStream和BufferedOutputStream用来提供字节读写操作的缓冲,可以降低实际的物理I/O读写次数。DataOutputStream可以将各种基本类型以及String格式化输出到流中,以便DataInputStream在另一端可以按照数据类型读取,PrintStream则是为了以可视化格式打印所有的基本类型以及String
示例:文件拷贝 可以看一下Apache中的I/O工具类IOUtils是如何复制文件的,其思路很简单,就是将输入流中读取的字节写到给定的输出流中
:org.apache.commons.io.IOUtils mark:20-23 1 2 3 4 5 6 7 8 9 10 11 12 13 14 15 16 17 18 19 20 21 22 23 24 25 private static final int EOF = -1 ;private static final int DEFAULT_BUFFER_SIZE = 1024 * 4 ;public static int copy (InputStream input, OutputStream output) throws IOException { long count = copyLarge(input, output); if (count > Integer.MAX_VALUE) { return -1 ; } return (int ) count; } public static long copyLarge (InputStream input, OutputStream output) throws IOException { return copyLarge(input, output, new byte [DEFAULT_BUFFER_SIZE]); } public static long copyLarge (InputStream input, OutputStream output, byte [] buffer) throws IOException { long count = 0 ; int n = 0 ; while (EOF != (n = input.read(buffer))) { output.write(buffer, 0 , n); count += n; } return count; }
有时可能希望等所有字节读完之后再整体进行处理,比如在加载class的场景中,那么可以先将读取的字节写入ByteArrayOutputStream保存下来,然后通过toByteArray()获取所有的字节进行解析处理
1.1.1. 压缩流 Java I/O类库支持读写压缩格式的数据流,可以用它们对已有的I/O类库基础上进行封装,以便提供压缩功能
类
功能
ZipInputStream
用于将数据压缩成Zip文件格式,InflaterInputStream的实现
ZipOutputStream
用于解压缩Zip文件格式的数据,DeflaterOutputStream的实现
GZIPInputStream
用于将数据压缩成GZIP文件格式,InflaterInputStream的实现
GZIPOutputStream
用于解压缩GZIP文件格式的数据,DeflaterOutputStream的实现
CheckedInputStream
提供getChechSum()为任何InputStream产生校验和
CheckedOutputStream
提供getChechSum()为任何OutputStream产生校验和
1.1.1.1. GZIP 如果对于单个数据流进行压缩读写,那么GZIP是比较合适的选择
:GZIP 1 2 3 4 5 6 7 8 9 10 11 12 13 14 15 16 17 18 19 20 21 public void gzipWrite (File src, File dest) throws FileNotFoundException, IOException{ try (InputStream input = new FileInputStream (src); BufferedOutputStream output = new BufferedOutputStream (new GZIPOutputStream (new FileOutputStream (dest)))){ byte [] buffer = new byte [1024 ]; int len = 0 ; while ((len = input.read(buffer)) != -1 ) { output.write(buffer, 0 , len); } } } public void gzipRead (File gzip) throws FileNotFoundException, IOException{ try (BufferedReader reader = new BufferedReader ( new InputStreamReader (new GZIPInputStream (new FileInputStream (gzip)), "UTF-8" ))){ String line = null ; while ((line = reader.readLine()) != null ) { System.out.println(line); } } }
1.1.1.2. Zip Java对于zip格式的文件有更全面的支持,可以使用标准zip格式对多个文件进行压缩。对于每个要加入压缩档案的文件,需要调用putNextEntry(),并将其传递给一个ZipEntry,ZipEntry中包含文件具体的各种信息,比如名称、大小、日期等
:Zip 1 2 3 4 5 6 7 8 9 10 11 12 13 14 15 16 17 18 19 20 21 22 23 24 25 26 27 28 29 30 31 32 33 34 public void zip (String destFile, String... files) throws FileNotFoundException, IOException{ try (ZipOutputStream zipOut = new ZipOutputStream ( new CheckedOutputStream (new FileOutputStream (destFile), new CRC32 ()))){ byte [] buffer = new byte [1024 ]; for (String file : files){ try (InputStream input = new FileInputStream (file);){ zipOut.putNextEntry(new ZipEntry (file)); int len = 0 ; while ((len = input.read(buffer)) != -1 ) { zipOut.write(buffer, 0 , len); } } } } } public void unzip (File zip, String destPath) throws FileNotFoundException, IOException{ try (ZipFile zipFile = new ZipFile (zip); ZipInputStream zipIn = new ZipInputStream (new CheckedInputStream (new FileInputStream (zip), new CRC32 ()))){ ZipEntry entry; byte [] buffer = new byte [1024 ]; while ((entry = zipIn.getNextEntry()) != null ){ String name = entry.getName(); try (InputStream input = zipFile.getInputStream(entry); FileOutputStream output = new FileOutputStream (destPath + File.separator + name)){ int len = 0 ; while ((len = input.read(buffer)) != -1 ) { output.write(buffer, 0 , len); } } } } }
除了Jdk自带的类库之外,Java社区也有一些比较好用的第三方类库,比如
1.1.1.3. zip4j zip4j可以进行目录压缩与文件压缩,同时提供加解密的支持,具体可以参考官网:http://www.lingala.net/zip4j.html
:pom 1 2 3 4 5 <dependency > <groupId > net.lingala.zip4j</groupId > <artifactId > zip4j</artifactId > <version > 1.3.2</version > </dependency >
:zip4j 1 2 3 4 5 6 7 8 9 10 11 12 13 14 15 16 17 18 19 20 21 22 23 24 25 26 27 28 29 30 31 32 33 34 35 public void zip (String destFile, String passwd, File... files) throws ZipException { ZipParameters parameters = new ZipParameters (); parameters.setCompressionMethod(Zip4jConstants.COMP_DEFLATE); parameters.setCompressionLevel(Zip4jConstants.DEFLATE_LEVEL_NORMAL); parameters.setEncryptFiles(true ); parameters.setEncryptionMethod(Zip4jConstants.ENC_METHOD_STANDARD); parameters.setPassword(passwd.toCharArray()); ZipFile zipFile = new ZipFile (destFile); for (File file : files) { if (file.isDirectory()){ zipFile.addFolder(file, parameters); }else { zipFile.addFile(file, parameters); } } } public void unzip (File zip, String destPath, String passwd) throws ZipException { ZipFile zipFile = new ZipFile (zip); zipFile.setFileNameCharset("UTF-8" ); if (!zipFile.isValidZipFile()) { throw new ZipException (); } if (zipFile.isEncrypted()) { zipFile.setPassword(passwd.toCharArray()); } zipFile.extractAll(destPath); }
1.1.1.4. commons-compress commons-compress只能支持文件的压缩读写,但是支持多种压缩打包格式,比如tar、zip、jar等
:pom 1 2 3 4 5 <dependency > <groupId > org.apache.commons</groupId > <artifactId > commons-compress</artifactId > <version > 1.18</version > </dependency >
:commons-compress 1 2 3 4 5 6 7 8 9 10 11 12 13 14 15 16 17 18 19 20 21 22 23 24 25 26 27 28 29 30 31 32 33 34 35 36 37 38 39 40 41 42 43 44 45 46 47 48 49 50 51 52 53 public void tar (String destFile, File... files) throws IOException{ try (TarArchiveOutputStream tarOut = new TarArchiveOutputStream (new FileOutputStream (destFile))){ for (File file : files){ TarArchiveEntry entry = new TarArchiveEntry (file.getName()); entry.setSize(file.length()); tarOut.putArchiveEntry(entry); try (FileInputStream fileInputStream = new FileInputStream (file)){ IOUtils.copy(fileInputStream, tarOut); } tarOut.closeArchiveEntry(); } } } public void untar (File tar, String destPath) throws IOException{ try (TarArchiveInputStream tarIn = new TarArchiveInputStream (new FileInputStream (tar))){ ArchiveEntry archiveEntry = null ; while ((archiveEntry = tarIn.getNextEntry()) != null ) { String name = archiveEntry.getName(); try (FileOutputStream output = new FileOutputStream (destPath + File.separator + name)){ IOUtils.copyLarge(tarIn, output, 0 , archiveEntry.getSize()); } } } } public void zip (String destFile, File... files) throws IOException{ try (ZipArchiveOutputStream zipOut = new ZipArchiveOutputStream (new File (destFile))){ zipOut.setEncoding("UTF-8" ); zipOut.setUseZip64(Zip64Mode.AsNeeded); zipOut.setMethod(ZipArchiveOutputStream.STORED); for (File file : files){ ZipArchiveEntry entry = new ZipArchiveEntry (file.getName()); zipOut.putArchiveEntry(entry); try (FileInputStream fileInputStream = new FileInputStream (file)){ IOUtils.copy(fileInputStream, zipOut); } zipOut.closeArchiveEntry(); } } } public void unZip (File zip, String destPath) throws IOException{ try (ZipArchiveInputStream zipInput = new ZipArchiveInputStream (new FileInputStream (zip))){ ArchiveEntry archiveEntry = null ; while ((archiveEntry = zipInput.getNextEntry()) != null ) { String name = archiveEntry.getName(); try (FileOutputStream output = new FileOutputStream (destPath + File.separator + name)){ IOUtils.copyLarge(zipInput, output, 0 , archiveEntry.getSize()); } } } }
1.2. NIO(FileChanel) Java在1.4之后引入新I/O类库,即java.nio.*,其目的在于提高速度,而速度的提高来自于所使用的结构更接近于操作系统执行I/O的方式:即通道Channel和缓冲器Buffer 。可以想象一个煤矿,通道是包含数据的矿藏,而缓冲器则是派往矿藏的卡车,卡车负责运送数据,我们直接通过与卡车进行交互来获取数据。
关于通道和缓冲区,可以参考笔记[NIO Buffer ]和[NIO Channel & Selector ],这里主要讨论文件I/O,即FileChanel,它可以从FileInputStream、FileOutputStream以及RandomAccessFile中进行获取,它们都提供了接口getChannel()
示例: 文件拷贝 FileChannel 思路与上面一样,开辟两个通道,并通过一个缓冲器进行交互
:FileChannel mark:6-11 1 2 3 4 5 6 7 8 9 10 11 12 13 public void copyFile (File src, File dest) throws IOException{ try (FileInputStream input = new FileInputStream (src); FileOutputStream output = new FileOutputStream (dest); FileChannel inChannel = input.getChannel(); FileChannel outChannel = output.getChannel()){ ByteBuffer buffer = ByteBuffer.allocate(2048 ); while ((inChannel.read(buffer) != -1 )){ buffer.flip(); outChannel.write(buffer); buffer.clear(); } } }
示例: 文件拷贝 transferFrom 其实对于文件拷贝,FileChannel还提供了一种更直接的方式,即transferFrom和transferTo,它允许将一个通道与另一个通道直接相连,从而省去了使用缓冲器的过程。这样传输可能非常快,尤其是在底层操作系统提供支持的情况下,一些操作系统可以执行直接传输,而无需通过用户空间传递数据
可以看下Apache提供的文件工具类FileUtils,它就是通过transferTo进行复制操作的
:org.apache.commons.io.FileUtils mark:54-60 1 2 3 4 5 6 7 8 9 10 11 12 13 14 15 16 17 18 19 20 21 22 23 24 25 26 27 28 29 30 31 32 33 34 35 36 37 38 39 40 41 42 43 44 45 46 47 48 49 50 51 52 53 54 55 56 57 58 59 60 61 62 63 64 65 66 67 68 69 70 71 72 73 74 75 public static final long ONE_KB = 1024 ; public static final long ONE_MB = ONE_KB * ONE_KB; private static final long FILE_COPY_BUFFER_SIZE = ONE_MB * 30 ; public static void copyFile (File srcFile, File destFile) throws IOException { copyFile(srcFile, destFile, true ); } public static void copyFile (File srcFile, File destFile, boolean preserveFileDate) throws IOException { if (srcFile == null ) { throw new NullPointerException ("Source must not be null" ); } if (destFile == null ) { throw new NullPointerException ("Destination must not be null" ); } if (srcFile.exists() == false ) { throw new FileNotFoundException ("Source '" + srcFile + "' does not exist" ); } if (srcFile.isDirectory()) { throw new IOException ("Source '" + srcFile + "' exists but is a directory" ); } if (srcFile.getCanonicalPath().equals(destFile.getCanonicalPath())) { throw new IOException ("Source '" + srcFile + "' and destination '" + destFile + "' are the same" ); } File parentFile = destFile.getParentFile(); if (parentFile != null ) { if (!parentFile.mkdirs() && !parentFile.isDirectory()) { throw new IOException ("Destination '" + parentFile + "' directory cannot be created" ); } } if (destFile.exists() && destFile.canWrite() == false ) { throw new IOException ("Destination '" + destFile + "' exists but is read-only" ); } doCopyFile(srcFile, destFile, preserveFileDate); } private static void doCopyFile (File srcFile, File destFile, boolean preserveFileDate) throws IOException { if (destFile.exists() && destFile.isDirectory()) { throw new IOException ("Destination '" + destFile + "' exists but is a directory" ); } FileInputStream fis = null ; FileOutputStream fos = null ; FileChannel input = null ; FileChannel output = null ; try { fis = new FileInputStream (srcFile); fos = new FileOutputStream (destFile); input = fis.getChannel(); output = fos.getChannel(); long size = input.size(); long pos = 0 ; long count = 0 ; while (pos < size) { count = size - pos > FILE_COPY_BUFFER_SIZE ? FILE_COPY_BUFFER_SIZE : size - pos; pos += output.transferFrom(input, pos, count); } } finally { IOUtils.closeQuietly(output); IOUtils.closeQuietly(fos); IOUtils.closeQuietly(input); IOUtils.closeQuietly(fis); } if (srcFile.length() != destFile.length()) { throw new IOException ("Failed to copy full contents from '" + srcFile + "' to '" + destFile + "'" ); } if (preserveFileDate) { destFile.setLastModified(srcFile.lastModified()); } }
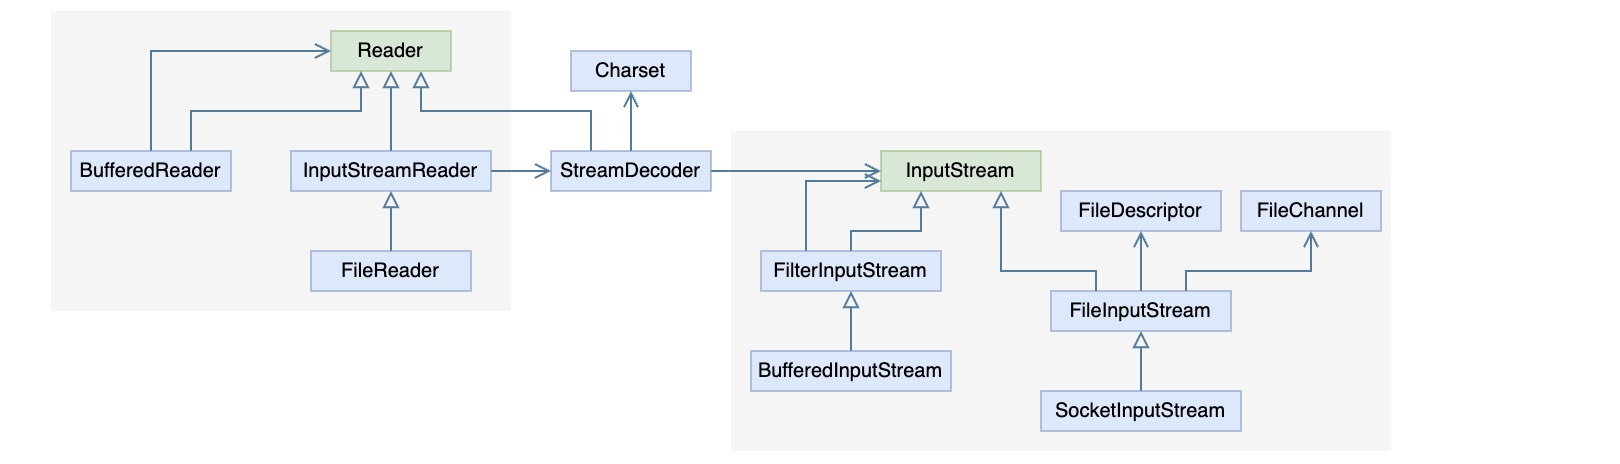
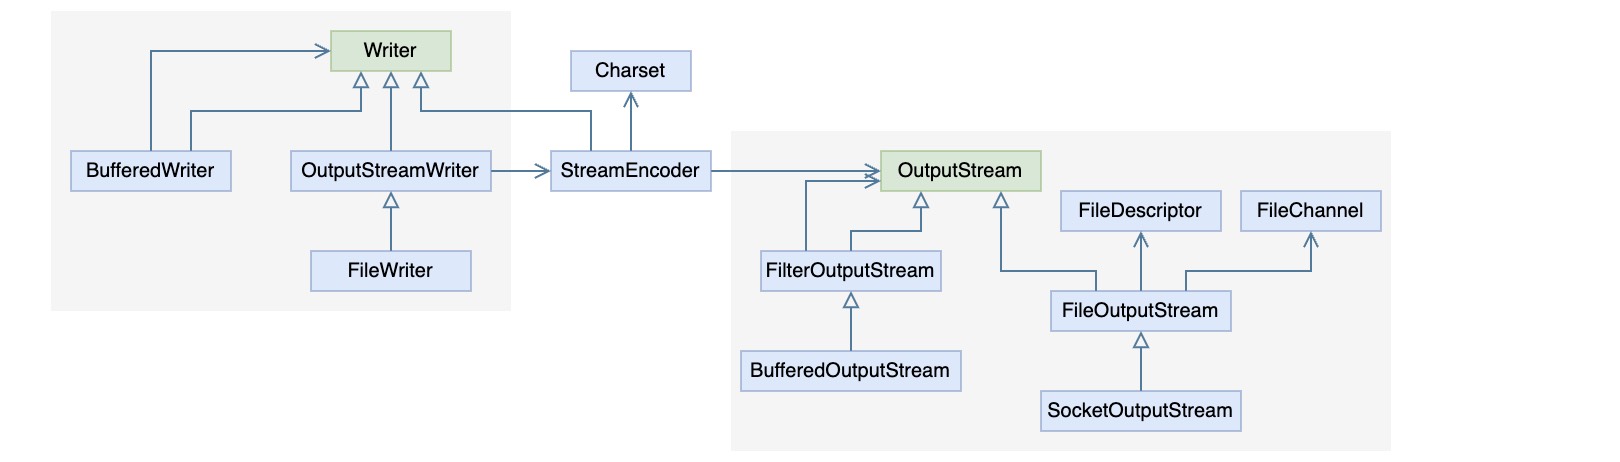
2. 字符流处理 2.1. IO(Reader/Writer) Java类库提供了基于字符处理的读写接口Reader和Writer,而在字符与字节之间有一个编解码的过程,于是以Encoder和Decoder作为桥梁,使用适配模式提供了一种比较好的方式将字节流的读写转化为字符的读写,而这个适配器就是InputStreamReader和OutputStreamWriter,如下图所示
从图中可以看出,在字节流处理与字符流处理的类结构中,都有各自的装饰器用以提供更方便的功能,比如BufferedReader,
示例: 文本读写 可以借鉴之前的思路,创建一个字符缓存,然后通过BufferedReader进行读写
:Stream 1 2 3 4 5 6 7 8 9 10 11 12 public void copyByBuffer () throws FileNotFoundException, IOException { try (BufferedReader reader = new BufferedReader (new InputStreamReader (new FileInputStream ("src.txt" ), "UTF-8" )); BufferedWriter writer = new BufferedWriter (new OutputStreamWriter (new FileOutputStream ("dest.txt" ), "UTF-8" ))){ char [] chars = new char [10 ]; int len = 0 ; while ((len = reader.read(chars)) != -1 ){ writer.write(chars, 0 , len); } } }
其实对于可读文本,BufferedReader还提供了一个比较好用的接口readLine(),可以对数据逐行进行处理
:Stream 1 2 3 4 5 6 7 8 9 10 11 12 public void copyByLine () throws FileNotFoundException, IOException { try (BufferedReader reader = new BufferedReader (new InputStreamReader (new FileInputStream ("src.txt" ), "UTF-8" )); BufferedWriter writer = new BufferedWriter (new OutputStreamWriter (new FileOutputStream ("dest.txt" ), "UTF-8" ))){ String line = null ; while ((line = reader.readLine()) != null ){ writer.write(line); writer.newLine(); } } }
对于普通文本可以很方便地通过行读取进行处理,但是普通文本的表达能力毕竟有限,有时会使用Xml或者Json来描述一些更结构化的信息,当然对于这些文本也有对应的解析办法,后面再统一进行梳理
2.2. NIO(FileChanel) 类似的,也可以使用FileChanel进行文本读写,只是需要自己处理编解码问题
示例: 文本读写 :FileChanel 1 2 3 4 5 6 7 8 9 10 11 12 13 14 15 16 17 18 19 20 21 22 23 24 25 public static void read (String file) throws FileNotFoundException, IOException { Charset charset = Charset.forName("UTF-8" ); try (FileInputStream input = new FileInputStream (file); FileChannel inChannel = input.getChannel()){ ByteBuffer buffer = ByteBuffer.allocate(1024 ); while (inChannel.read(buffer) != -1 ){ buffer.flip(); System.out.print(charset.decode(buffer)); buffer.clear(); } } } public void write (String data, String file) throws FileNotFoundException, IOException { try (FileOutputStream output = new FileOutputStream (file); FileChannel outChannel = output.getChannel()){ byte [] bytes = data.getBytes("UTF-8" ); ByteBuffer buffer = ByteBuffer.allocate(bytes.length); buffer.put(bytes); buffer.flip(); outChannel.write(buffer); buffer.clear(); } }
3. 随机读写 RandomAccessFile 前面说的流或者通道读写,都是顺序的,不能随机访问。于是,RandomAccessFile自成一派,支持对文件的随机读写,但是如果在文件中随机插入内容时,将会覆盖掉原有内容,如果不想覆盖,则需要先将原有内容读取出来,然后把插入内容写入之后再将原有内容追加到后面 它只实现了接口DataOutput和DataInput,约定了从基本数据类型与字节的操作交互方式,类层次结构也比较简单
因此,在使用RandomAccessFile时必须先清楚文件的内容排版,然后才能正确的操作,否则可能损坏文件造成不可读
下面可以写个简单示例:
1 2 3 4 5 6 7 8 9 10 11 12 13 14 15 16 17 public void randomRW (File file) throws IOException{ RandomAccessFile access = new RandomAccessFile (file, "rw" ); long pointer = access.getFilePointer(); for (int i = 0 ; i < 10 ; i++){ access.writeInt(i); } access.writeUTF("我是小铭啊~" ); access.seek(pointer + 4 * 5 ); System.out.println(access.readInt()); access.seek(pointer + 4 * 10 ); System.out.println(access.readUTF()); access.close(); }
4. 内存映射 内存映射文件其实是走的虚拟内存那一套,其思路是创建内存与文件地址的映射关系,将对文件的读写转化为对内存的操作,具体可以参考之前的笔记:Linux I/O模型
Java中将映射的结果表示为MappedByteBuffer,其继承自ByteBuffer,因此具有相应的读写接口,但是同样要求清楚文件的内容结构,而这里所有的操作都是针对缓存的,因此看上去就是操作一个数组
具体的操作方法是:
通过RandomAccessFile类获取FileChannel,使其具备读写功能
通过FileChannel获取MappedByteBuffer,包扩三个参数:映射类型、起始位置、映射长度,映射之后就跟通道没有关系了
直接对MappedByteBuffer进行内存读写操作,然后操作系统会检测到被修改的内存脏页并同步到文件中
1 2 3 4 5 6 7 8 9 10 11 12 public void mapRW (File file) throws FileNotFoundException, IOException{ RandomAccessFile access = new RandomAccessFile (file, "rw" ); MappedByteBuffer fileMap = access.getChannel().map(MapMode.READ_WRITE, 0 , 0XFF ); access.close(); for (int i = 0 ; i < file.length(); i++) { System.out.print((char )fileMap.get(i)); } for (int i = 0 ; i < file.length() / 4 ; i++) { fileMap.putChar('t' ); } }
5. 标准I/O 标准I/O的术语参考自Unix,其意义在于:可以很容易的将程序串联起来,即一个程序的标准输出可以成为另一个程序的标准输入。按照标准I/O模型,Java提供了对应的System.in、System.out、System.err,在此基础上可以进行适配和装饰以便更好的读写,比如
1
2
BufferedReader reader = new BufferedReader (new InputStreamReader (System.in));PrintWriter writer = new PrintWriter (System.out, true );
另外,System也提供了方法用来对标准I/O进行重定向,比如当控制台输出比较多不方便查看时,可以通过System.setOut()重定向到指定文件,下面看一下其是如何初始化的
:java.lang.System 1 2 3 4 5 6 7 8 9 10 11 12 13 14 15 16 17 18 19 20 21 22 public final static InputStream in = null ;public final static PrintStream out = null ;public final static PrintStream err = null ;private static native void setIn0 (InputStream in) ;private static native void setOut0 (PrintStream out) ;private static native void setErr0 (PrintStream err) ;private static void initializeSystemClass () { FileInputStream fdIn = new FileInputStream (FileDescriptor.in); FileOutputStream fdOut = new FileOutputStream (FileDescriptor.out); FileOutputStream fdErr = new FileOutputStream (FileDescriptor.err); setIn0(new BufferedInputStream (fdIn)); setOut0(newPrintStream(fdOut, props.getProperty("sun.stdout.encoding" ))); setErr0(newPrintStream(fdErr, props.getProperty("sun.stderr.encoding" ))); }
可以看到,其背后还是针对三个标准输入输出的文件描述符0、1、2打开的流,可以再看一下文件描述符的封装类FileDescriptor。其实上面不管是FileInputStream还是FileOutputStream,其背后也都是通过文件描述符进行
:java.io.FileDescriptor mark:9 1 2 3 4 5 6 7 8 9 10 11 12 13 public static final FileDescriptor in = standardStream(0 );public static final FileDescriptor out = standardStream(1 );public static final FileDescriptor err = standardStream(2 );private static FileDescriptor standardStream (int fd) { FileDescriptor desc = new FileDescriptor (); desc.handle = set(fd); return desc; } private static native long set (int d) ;
可以看出来FileDescriptor在构造时主要是根据文件描述符设置了一个句柄,下面简单看一下Java在windows中对于标准I/O句柄的获取
:openjdk\jdk\src\windows\native\java\io\FileDescriptor_md.c 1 2 3 4 JNIEXPORT jlong JNICALL Java_java_io_FileDescriptor_set (JNIEnv *env, jclass fdClass, jint fd) { SET_HANDLE(fd); }
:openjdk\jdk\src\windows\native\java\io\io_util_md.h 1 2 3 4 5 6 7 8 9 10 11 12 13 14 #define SET_HANDLE(fd) \ if (fd == 0) { \ return (jlong)GetStdHandle(STD_INPUT_HANDLE); \ } else if (fd == 1) { \ return (jlong)GetStdHandle(STD_OUTPUT_HANDLE); \ } else if (fd == 2) { \ return (jlong)GetStdHandle(STD_ERROR_HANDLE); \ } else { \ return (jlong)-1; \ } \
参考:
《Java编程思想》
《深入分析 Java Web》
https://howtodoinjava.com/java/nio/transfer-data-between-channels/ https://blog.csdn.net/mrliuzhao/article/details/89453082 https://blog.csdn.net/zhlily1/article/details/109492035